> ## Documentation Index
> Fetch the complete documentation index at: https://docs.recordengine.ai/llms.txt
> Use this file to discover all available pages before exploring further.
# Extraction Profiles
> How to use and create extraction profiles — the templates that tell the AI exactly what to extract from each document type.
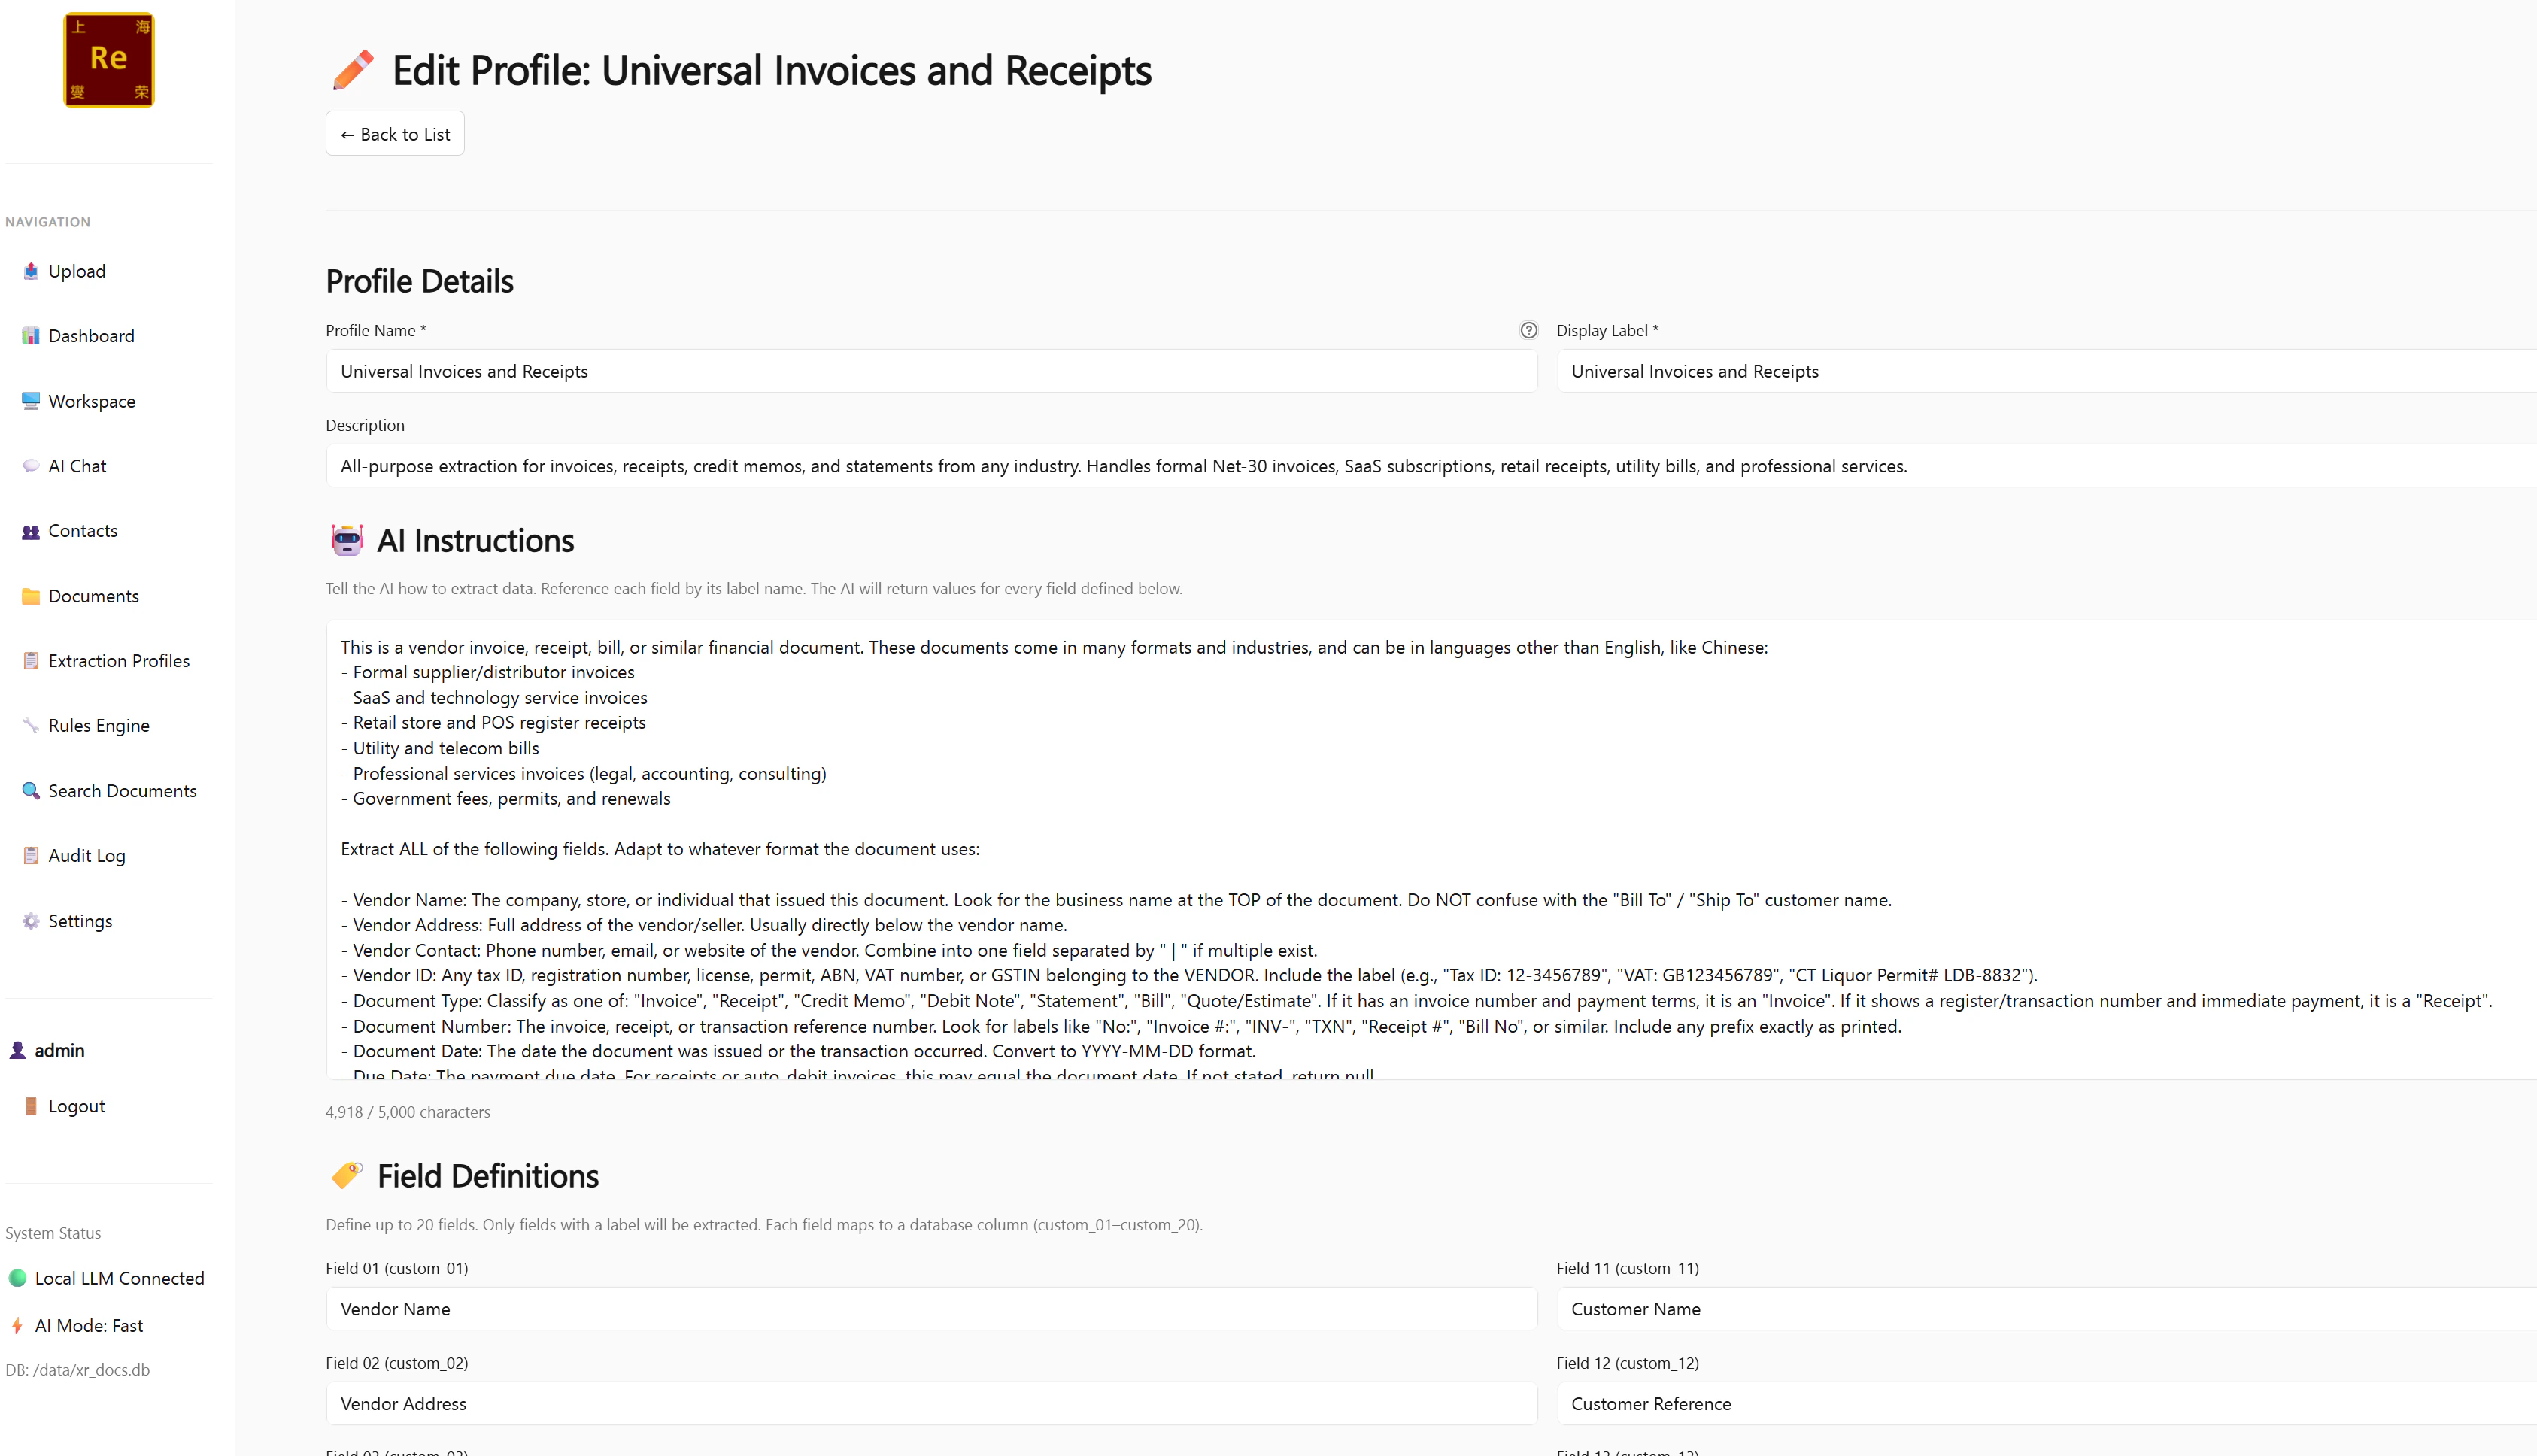
An **extraction profile** is a template that tells the AI what fields to look for in a document. Instead of extracting everything it can find, the AI focuses on the exact fields you've defined — with the labels you've chosen — and ignores everything else.
This is why a Standard Invoice profile extracts *Vendor*, *Invoice Number*, and *Total Amount*, while a Meeting Notes profile extracts *Attendees*, *Action Items*, and *Decisions*.
 ***
## Built-In Profiles
RecordEngine ships with **7 built-in profiles** that cover the most common document types. They are ready to use immediately — no configuration needed.
A general-purpose profile for any document type. Extracts common fields like title, date, parties, and key amounts. Use this when you haven't yet created a custom profile for a document type.
Designed for English-language invoices. Extracts: Vendor, Invoice Number, Invoice Date, Due Date, PO Number, Currency, Subtotal, Tax, Total Amount, Payment Terms, and line items.
A broader invoice profile that handles a wider range of formats including receipts, credit notes, and informal invoices. More tolerant of missing fields.
For Word documents, text files, or audio transcriptions of meetings. Extracts: Meeting Date, Attendees, Agenda, Decisions Made, Action Items, and Follow-Up Date.
Built specifically for Chinese tax invoices. Extracts: Seller Name, Seller Tax Number, Buyer Name, Buyer Tax Number, Fapiao Number, Fapiao Code, Issue Date, Amount Before Tax, Tax Rate, Tax Amount, Total Amount. Handles red stamps and traditional fapiao layouts.
For Chinese business registration certificates. Extracts: Company Name (Chinese and English), Unified Social Credit Code, Legal Representative, Registered Capital, Business Scope, Registration Date, Registered Address.
A meta-profile — upload a sample document with this profile and the AI will suggest a custom extraction profile tailored to that document type. Use it as a starting point when creating custom profiles.
***
## Creating a Custom Profile
When the built-in profiles don't match your document type, create a custom profile.
Click **Extraction Profiles** in the left sidebar, then click **+ New Profile**.
Give it a clear name that reflects the document type — for example, *"Customs Declaration"*, *"Employee Expense Report"*, or *"Purchase Order"*.
Click **+ Add Field** for each piece of information you want to extract.
For each field you set:
* **Label** — the human-readable name shown in the UI, CSV exports, and webhook payloads (e.g. *"Vendor Name"*)
* **Key** — the machine-readable identifier used in API responses (auto-generated from the label, e.g. `vendor_name`)
* **Description** — optional hint to the AI about what this field contains (improves accuracy on ambiguous fields)
Click **Save**. The profile is immediately available for selection when uploading documents.
***
## Built-In Profiles
RecordEngine ships with **7 built-in profiles** that cover the most common document types. They are ready to use immediately — no configuration needed.
A general-purpose profile for any document type. Extracts common fields like title, date, parties, and key amounts. Use this when you haven't yet created a custom profile for a document type.
Designed for English-language invoices. Extracts: Vendor, Invoice Number, Invoice Date, Due Date, PO Number, Currency, Subtotal, Tax, Total Amount, Payment Terms, and line items.
A broader invoice profile that handles a wider range of formats including receipts, credit notes, and informal invoices. More tolerant of missing fields.
For Word documents, text files, or audio transcriptions of meetings. Extracts: Meeting Date, Attendees, Agenda, Decisions Made, Action Items, and Follow-Up Date.
Built specifically for Chinese tax invoices. Extracts: Seller Name, Seller Tax Number, Buyer Name, Buyer Tax Number, Fapiao Number, Fapiao Code, Issue Date, Amount Before Tax, Tax Rate, Tax Amount, Total Amount. Handles red stamps and traditional fapiao layouts.
For Chinese business registration certificates. Extracts: Company Name (Chinese and English), Unified Social Credit Code, Legal Representative, Registered Capital, Business Scope, Registration Date, Registered Address.
A meta-profile — upload a sample document with this profile and the AI will suggest a custom extraction profile tailored to that document type. Use it as a starting point when creating custom profiles.
***
## Creating a Custom Profile
When the built-in profiles don't match your document type, create a custom profile.
Click **Extraction Profiles** in the left sidebar, then click **+ New Profile**.
Give it a clear name that reflects the document type — for example, *"Customs Declaration"*, *"Employee Expense Report"*, or *"Purchase Order"*.
Click **+ Add Field** for each piece of information you want to extract.
For each field you set:
* **Label** — the human-readable name shown in the UI, CSV exports, and webhook payloads (e.g. *"Vendor Name"*)
* **Key** — the machine-readable identifier used in API responses (auto-generated from the label, e.g. `vendor_name`)
* **Description** — optional hint to the AI about what this field contains (improves accuracy on ambiguous fields)
Click **Save**. The profile is immediately available for selection when uploading documents.
 Each profile supports up to **20 custom fields**. The AI can also detect line items (individual rows in a table) regardless of profile — line item extraction is always on.
***
## Field Labels Flow Everywhere
Whatever labels you set in a profile flow through the entire system consistently:
| Where | What you see |
| --------------------- | ---------------------------------------------------------- |
| Document detail panel | Your label as the field name |
| Edit mode | Your label as the input label |
| CSV export | Your label as the column header |
| Outbound webhook | Your label (converted to snake\_case) as the JSON key |
| AI Chat | The AI uses your labels when referencing fields in answers |
| Rules Engine | Your custom fields appear as condition options |
This means if you rename a field from `field_01` to `Vendor Name`, the change propagates everywhere instantly.
***
## Using the Profile Drafter
Not sure which fields to define? Use the **Extraction Profile Drafter** to generate a starting point.
1. Upload a representative sample document using the **Extraction Profile Drafter** profile
2. The AI analyses the document and returns a suggested profile structure — a list of fields it detected, with suggested labels and descriptions
3. Go to **Extraction Profiles → New Profile** and use the suggestions as your starting field list
4. Adjust as needed and save
Use 2–3 representative samples rather than one — upload each with the Extraction Profile Drafter, then combine the best field suggestions from each result into your final profile.
***
## Setting a Default Profile Per Contact
You can assign a default extraction profile to any contact so that documents uploaded to that contact automatically use the right profile — without having to select it manually on every upload.
1. Open the contact
2. Click **Edit**
3. Set **Default Extraction Profile** to the appropriate profile
4. Save
From then on, any document uploaded to that contact uses that profile automatically — including documents received via email intake.
***
## Assigning a Profile on Upload
Even if a contact has a default profile, you can override it on a per-document basis at upload time:
1. On the Upload page, use the **Extraction Profile** dropdown
2. Select any profile from the list
3. The selected profile is used for this document only — the contact default is unchanged
***
## Profile Scoping in the Rules Engine
Extraction profiles integrate with the Rules Engine — you can scope a rule to only fire on documents processed with a specific profile. For example:
> *"If profile = Chinese Fapiao AND confidence\_score \< 70 → Send Notification to accounts team"*
Custom profile fields also appear as condition options in the Rules Engine once a profile is selected as the scope. See [Rules Engine](/user-guide/rules-engine) for details.
Each profile supports up to **20 custom fields**. The AI can also detect line items (individual rows in a table) regardless of profile — line item extraction is always on.
***
## Field Labels Flow Everywhere
Whatever labels you set in a profile flow through the entire system consistently:
| Where | What you see |
| --------------------- | ---------------------------------------------------------- |
| Document detail panel | Your label as the field name |
| Edit mode | Your label as the input label |
| CSV export | Your label as the column header |
| Outbound webhook | Your label (converted to snake\_case) as the JSON key |
| AI Chat | The AI uses your labels when referencing fields in answers |
| Rules Engine | Your custom fields appear as condition options |
This means if you rename a field from `field_01` to `Vendor Name`, the change propagates everywhere instantly.
***
## Using the Profile Drafter
Not sure which fields to define? Use the **Extraction Profile Drafter** to generate a starting point.
1. Upload a representative sample document using the **Extraction Profile Drafter** profile
2. The AI analyses the document and returns a suggested profile structure — a list of fields it detected, with suggested labels and descriptions
3. Go to **Extraction Profiles → New Profile** and use the suggestions as your starting field list
4. Adjust as needed and save
Use 2–3 representative samples rather than one — upload each with the Extraction Profile Drafter, then combine the best field suggestions from each result into your final profile.
***
## Setting a Default Profile Per Contact
You can assign a default extraction profile to any contact so that documents uploaded to that contact automatically use the right profile — without having to select it manually on every upload.
1. Open the contact
2. Click **Edit**
3. Set **Default Extraction Profile** to the appropriate profile
4. Save
From then on, any document uploaded to that contact uses that profile automatically — including documents received via email intake.
***
## Assigning a Profile on Upload
Even if a contact has a default profile, you can override it on a per-document basis at upload time:
1. On the Upload page, use the **Extraction Profile** dropdown
2. Select any profile from the list
3. The selected profile is used for this document only — the contact default is unchanged
***
## Profile Scoping in the Rules Engine
Extraction profiles integrate with the Rules Engine — you can scope a rule to only fire on documents processed with a specific profile. For example:
> *"If profile = Chinese Fapiao AND confidence\_score \< 70 → Send Notification to accounts team"*
Custom profile fields also appear as condition options in the Rules Engine once a profile is selected as the scope. See [Rules Engine](/user-guide/rules-engine) for details.